
I know we've all seen those beautiful, organized kitchen pantries while we are scrolling through Instagram and as we pin those "fairy tale" pictures of our dream pantries we think to ourselves "yeah right, my kitchen pantry could never look like that." I'm here to tell you that your hot mess of a pantry could most definitely look like a beautiful Pinterest pantry! In this post, I'm going to demystify the dream kitchen pantry by simplifying it and sharing with you how I transformed my client's pantry in one day!
I've been working on this client's home for some time now and we were so close to finishing but with the pandemic that is currently putting a damper on everything, our remodel came to a screeching halt. Currently we are in limbo with about 1/4 of the cabinetry in the kitchen area still needing to be done; including the pantry and pantry doors. That means that everything inside the pantry is exposed all day, every day. Can you imagine that? Kitchen pantries are usually an eye-sore as it is and to have to look at it every time you go to the kitchen can be outright depressing! My client had seen what I had done to organize my own pantry (you can see that HERE) and asked me to do the same for her. She was tired of seeing all the mess in there and since she didn't have the luxury of just closing the pantry doors to forget about it, she hired me to transform it!
 |
| My kitchen pantry! Still love it to this day! |
When you see the state of the pantry before I got my hands on it, the job definitely looked overwhelming but I'm here to tell you it's not. All we had to do was to dedicate ONE EVENING AND ONE DAY to tackle it and it was DONE!
 |
| the state of my client's pantry made it impossible to find anything |
In this post I'm listing the steps I took to organize this kitchen pantry to show you how easy it really is!
STEP ONE - SHOPPING
You would think that this would be the last step but it's not. I find it to be way too time consuming and confusing to try and figure out every little thing you need. I find it easier to buy allllll the things first and then return what you don't use. That's exactly what I did for my pantry and also for my client's pantry. I do have an idea as to what type of items are needed so here is a list that you can use to get an idea for your own pantry.
- deep baskets to put large items like bags of chips, water bottles, ect. I prefer baskets that are not clear so that they hide what's inside which eliminates visual clutter
- shallow and wide baskets to put pans, paper plates, ect
- shallow and narrow baskets to corral jars, cans and tall bottles.
- small and deep baskets to put snacks and other items
- clear containers for snacks, cereals, pastas, rice, baking ingredients, ect.
TIPS WHEN CHOOSING YOUR ITEMS
- Stick with a color scheme. The reason most pantries look messy is because all of the visual clutter coming from cans and boxes. The goal isn't to just organize your items. The goal is to also eliminate as much visual clutter as possible by not only keeping your food inside containers, but also by having those containers be beautiful to look at.
- Try to buy all of your items in one or two stores.
95% of the items for the pantry were purchased at IKEA. They literally have everything you need for organization and not only are their items aesthetically pleasing, they're also very affordable! Everything else, like the step ladder and a couple trays were purchased at home goods. One-stop shopping definitely saves time! I purchased everything in one evening!
 |
| 95% off the items were purchased at IKEA. Gotta love them! |
 |
| these storage bins are perfect for larger items like big bags of chips or large bottles of drinks |
STEP 2 - TAKE OUT ALL ITEMS AND CREATE GROUPS
This is where the fun begins! Designate a space to place your items, anywhere close to the pantry will do. I grouped all our items on the kitchen floor and on the island. Start taking things out one by one and create groups for them based on what they are. The bigger your pantry the more groups you can have and the smaller the pantry the less groups you can have so be smart about it. These are the groups I created for this pantry.
- canned products (sweet)
- canned products (savory)
- snacks
- pastas
- breads
- baking supplies (non edible, like cake candles, cupcake liners, ect.)
- baking ingredients ( flours, powders, sugars, food coloring, sprinkles, icing, ect.)
- drinks
- spices
- jarred items (sweet)
- jarred items (savory)
- tall items like oils and syrups
- nutritional items like vitamins, shakes, medicine (although medicine should be in a medicine cabinet or a bathroom cabinet)
- paper products like napkins, paper plates
- miscellaneous items that don't belong in a pantry and will be put somewhere else
- trash
STEP 3 - STAGE YOUR EMPTY CANISTERS AND BASKETS IN YOUR PANTRY
Stage your organizational tools and items in a way that you think will work for you, and if you have family, that the pantry organization will work for them as well. Think about where you want items to be and let that be your guide. For instance in this pantry I wanted to make sure the drinks were towards the bottom and I wanted all the cereals and snacks to be reachable for kids.
After you stage everything, take a step back and see if the arrangement is aesthetically pleasing. If you notice, I tried to keep my arrangement symmetrical which makes everything look neat and balanced. Now, the items are only staged at this point so that means you aren't done arranging after this! You WILL have to tweak things around and move things so that they work better. Staging all your canisters, boxes and baskets helps to give you an idea as to how things will be housed and grouped together.
 |
| the beginning of great things! |
 |
| yes, this does look amazing but it's not realistic because everything is empty! |
STEP 4 - START PUTTING YOUR FOOD AND ITEMS BACK IN THE PANTRY
Keep your groups together! Anything that can be taken out of it's bag or box and put in a pretty container -do so! Pastas, chips, crackers, cookies, cereals, baking powders, flour, rice, legumes, even spices can be put in pretty containers that are cohesive and eliminate all that visual clutter. Anything that can't be taken out of it's package can be put in baskets if possible.
 |
| if you compare this image to the last image, you can see all the changes I had to make. |
STEP 5 - LABEL YOUR ITEMS AND GROUPS
When you are organizing anything, do it in a way that if any person would need to find something in that area that they would be able to without your help. That's what good organization would do and that's why labels come in handy! They're directions!
In this pantry I used little black index labels (so cute) on the shelves letting the family know what is there. I also labeled the large boxes because you can't see what's inside of them. Same for the canisters that aren't clear.
 |
| find these index labels HERE |
 |
| the chalk pen can be wiped off with a moist rag so the writing on the labels can be changed if needed |
 |
| my clients love their pineapple! |
 |
| a step-stool helps reach those items on the top of the pantry |
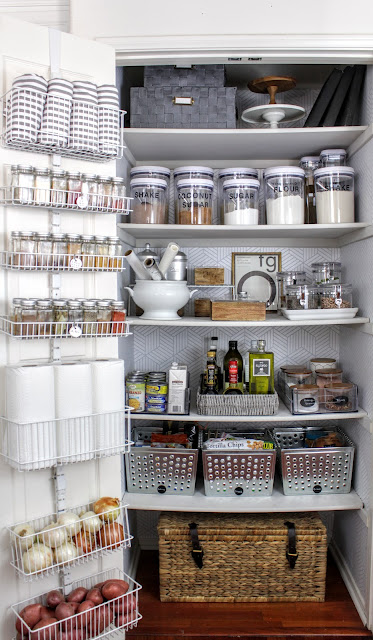
 |
| a beautiful and functional pantry! But, still can't wait 'till we get those doors! |
Even though we don't have the custom doors yet for my client's pantry, she doesn't have to look at a catastrophe every time she walks into the kitchen. Not only that, she knows exactly what she has in stock!
 |
| a place for everything and everything in it's place |
Hope this post encourages you all to make your Pinterest pantry dreams come true! If you have any questions please let me know because I'm here to help! Just ask me in the comments section below and I'll be sure to respond to you! If you're thinking of organizing your pantry and are in need of items like the ones I used in this project then head to your local IKEA store as most of the items are from there. If you don't have access to an IKEA store, then I listed similar items below that you can order online.
👇
Take care!
Oscar

No comments:
Post a Comment