Updated Master Bathroom with NO budget for Demolition is COMPLETE!
*Some items in this post have been sponsored but of course all opinions of this product are my own. Affiliate links are used in this post. Any product purchased through my affiliate links will help me with a small percentage of commision at no extra cost to you. As always I am thankful you are here!
After living with this style-lacking, turquoise master bathroom I am now enjoying this stylish upgrade in my home!
This bathroom project started off as something small. I was just going to simply paint the walls and change the lighting. After all, color and lighting can really transform a space. As a matter of fact, the very first thing I picked out for our master bathroom was the lighting. I wanted something that had a contemporary look but with a vintage twist. I started my search at Lamps Plus since they have s HUGE selection of lighting at many different price points which is important to me.
I fell in love with these mixed metal sconces that have a beautiful glass shade. The texture on the glass shade definitely gives the sconces a vintage vibe as well as the small touches of brass. It was important to find a light fixture that would diffuse the light because the bed in our bedroom faces the bathroom and if the light is too bright it is extremely bothersome to my eyes when I'm sitting in bed. When the lights go on, the textured glass gives the light a soft glow. It also helped that I installed a dimmer for the lights so if someone needs to use the bathroom in the middle of the night, we won't wake the other person up with blinding light.
These lights also happen to be budget-friendly at well under $200! I placed my order amd received my shipment in less than a week. (Per usual with Lamps Plus, they always ship quickly). If you want to check out these wall lamps you can CLICK HERE.
If you've been following along on the blog or on Instagram then you know that we didn't have a budget for a major renovation. That meant that we weren't going to rip anything out or change any major plumbing. This bathroom makeover was strictly cosmetic but even cosmetic changes make such a big difference. To appreciate the change, let's take a look at how the bathroom looked before the update. Builder-grade finishes and those ugly "showbiz lights" coordinate perfectly with the rusted shower curtain rod and the teal colored walls just brings the look together, LOL.
Before...
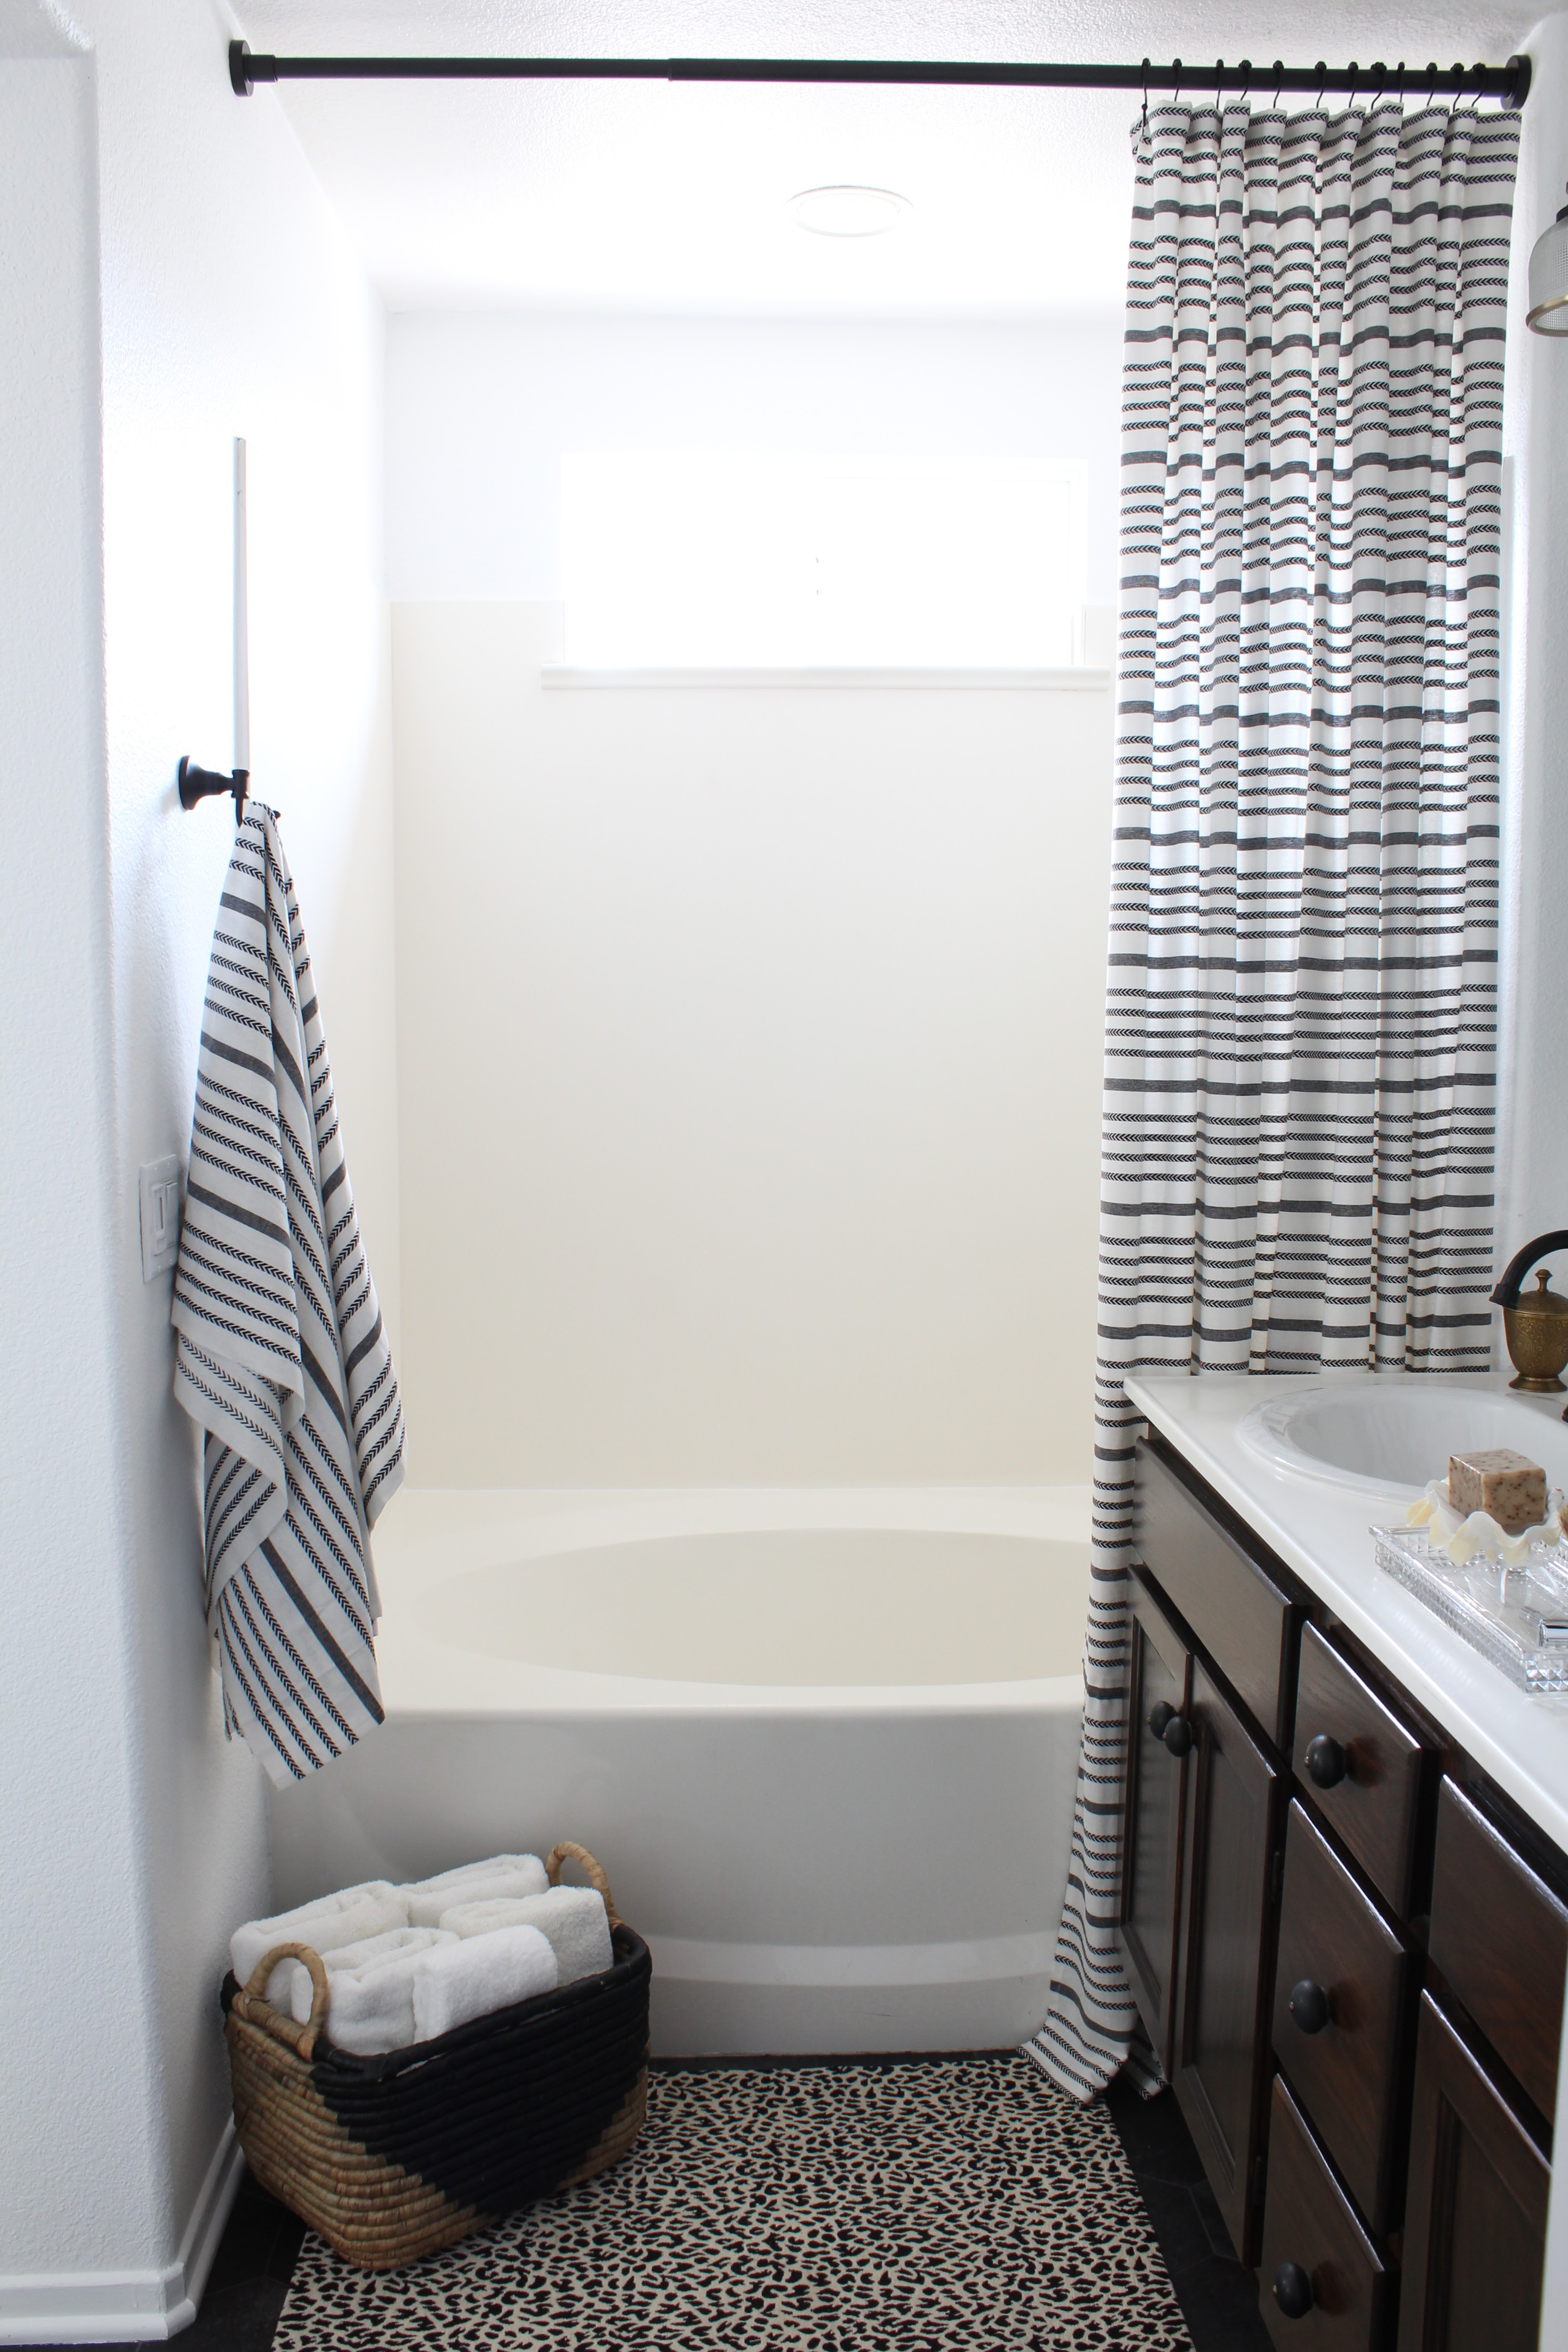
After...
SHOP ITEMS IN THIS POST BY CLICKING ON THE PICTURES BELOW
I am so happy with the way this bathroom turned out! I just wished I would have done this sooner! I never took our master bathroom seriously because for some reason I talked myself into thinking that only a major renovation would make this bathroom look good so we kept putting it off. I really need to practice what I preach because I definitely believe in the power of small changes.
Speaking of changes let me give you a rundown of the changes we made to this master bathroom.
LIGHTING
We swapped out the builder-grade lighting for stylish and affordable wall sconces from Lamps Plus. Nothing changes the mood of a space like lighting. The wall sconces retail at $179 each and I installed them myself with the help of my brother-in-law who is a lineman. He was guiding me over the phone via video-chat lol. I ran into a bit of a complication with the installation of the second sconce where I accidentally partially snipped a wire while cutting the drywall. Oops! I'm definitely not handy when it comes to things like that, but doing it myself saved us about $250 give or take.
WALLS
We painted over the peacock blue walls with simple white paint. Behr's Ultra Pure White which is literally "off the shelf" white is a fuss-free and easy to use color that I've used over and over again. After 4 coats (yes, 4 coats) the blue was gone! You know what else is gone? The dorky medicine cabinet. We did hire someone to take out the mirror and medicine cabinet and to drywall and texturize the hole where the medicine cabinet was. I didn't DIY that because DRYWALL and it was $260 to get someone to do it. Done! I probably could have done it myself but my wife didn't trust me, LOL.
One thing we did DIY was the backsplash. The white subway tile is actually not tile at all! They're big, 12" x 12" vinyl stickers! I am SO IMPRESSED with not only how it looks, but how easy it was to install! At $34 for 10 sheets, it was pretty affordable. I ordered 4 packs for the wall behind the mirrors.
FLOORS
We found another affordable option for the floors. This "luxury vinyl tile is thick and feels like the real thing. It's also groutable which makes the tile look even more like stone. The tile is peel and stick so installation is easy although I didn't do it, LOL. Again, my wife didn't trust that I would do a satisfactory job so we did hire someone to tile our bathroom floor and I'm glad we did. I've never installed tile and I didn't want to risk it looking all crooked and having to hear my wife complain about it for the rest of our lives. We paid $450 dollars for the installation. The installer said it was a two day job because of the fact that we were using floor adhesive to really make the tile stick and he had to wait 24 hours before grouting. (The directions on the package of the tile said they were just peel-and stick, but the reviews said that they didn't stick very well so we decided to add adhesive to the back of each tile.) Fair enough! Although we spent money on the installation, we didn't spend much on the tile. Each tile costs 99 cents and we ended up spending about $130 in total in tile for this bathroom.
I love rich wood tones and I knew that was the route I wanted to go with my existing bathroom cabinets. We got a quote to get them stained and the estimate came in at $850 which I think is way too much so I decided I was definitely going to DIY this project and stain the cabinet myself. I watched a bunch of youtube videos and got as much information as I could before starting this task.
To stain my cabinets I used a get stain which I found to be SO easy to work with. The thick stain penetrates deep into the wood so you need less coats and since the stain is thick, it doesn't run all over the place like traditional wood stain. The process was fairly easy and a first time DIYer can definitely tackle this project . If you can lightly sand and paint, you can do this because that's really all there is to it. In the Youtube videos I watched, some people sanded and some people didn't. I decided to sand AND clean the hell out of my cabinets and I'm really glad I did. In some parts of the cabinet where I didn't sand or clean thoroughly, the stain wouldn't penetrate as well and would look blotchy. I actually had to go back and re-sand those sections after I had already stained. Fortunately, that worked without a problem. After that, all you do is evenly spread stain on your cabinets, let it sit for a few minutes and then wipe away the excess with a clean, lint free towel. You keep doing that until you get the desired color. I put 4 coats on my cabinets to get a nice dark color and after a couple of days of staining (yes, a couple of days. It's best to let the stain dry a few hrs after every coat) I let the cabinets completely dry for 3 days before I sealed them with a satin polyurethane to protect my newly stained cabinets from dirt and water. Like I said, it was very easy but VERY time consuming. For this project, I spent about $16 for the gel stain, $11 for the polyurethane, $4 for a box of gloves, $5 for sandpaper, $11 for a fancy paintbrush, $3 for a tack cloth and $11 for 7 cabinet knobs. In total, I spent $68 for this project. SIXTY EIGHT DOLLARS. Compared to EIGHT-HUNDRED AND FIFTY DOLLARS!? I think I made the right choice even though it did take me a long time to complete.
The silhouette in these bathroom fixtures matched perfectly with both the mirrors and the base of the wall sconce. I chose the Oswell collection from Home Depot for the faucets and shower trim package. Everything was pretty affordable which was great because we did hire someone to install everything. Even though everyone around me told me that I could probably install all the bathroom fixtures myself, I didn't dare. I don't mess with anything water related because it can be so damaging to a home if anything leaks! It only cost us $250 to get everything installed so it wasn't bad. There was one thing that wasn't done, however and that was to have the shower knob installed. The shower knob to turn the water on and off was not installed because it didn't fit the valve that is inside the shower walls. Since we are not remodeling the shower, the plumber couldn't get to the valve easily and would have to cut a hole into the fiberglass, hopefully small enough to have the plate on the shower knob cover it. Oh and it was going to be anout $400 to do it. Well, that just made me all sorts of nervous. Aside from the expense, I was more more worried that something would go wrong with the plumbing and we would have to replace the whole damn shower, LOL. So I fired our plumber and decided to just spray paint the existing chrome shower knob fixture. No, I'm kidding. I didn't fire our plumber. He actually did a very good job and I'm glad he was honest with us. He actually was the one who recommended to spray paint the shower knob.
I googled "how to spray paint your shower fixtures" and I found a blog post by Bless'er House. She explains in detail how she sprayed hers and they looked amazing! Pretty much all you do is sand the fixture, tape the edges of the shower fixtures, close off your entire shower area in plastic, prime your shower fixtures with automotive spray primer, allow to dry, spray paint black(2 coats) and that's it!
Please check out Bless'er House's post where she gives you much more details on how to spray your bathroom fixtures.
ACCESSORIES
I treated our bathroom like I would any other space in the house. I accessorized it to bring out my my style in the space and also to give the space that "visual weight" or "finished, lived-in and not so new" look that I crave. From the towel hooks to the art, everything is a nod to my personal style.
One small tip I can give you for your bathroom accessories is to hang that shower curtain high! Instead of using your standard 72" long shower curtain, create height and presence in your bathroom by hanging regular 96" curtains that happen to not be shower curtains! You can actually find extra long shower curtain liners on Amazon so that you can line your regular curtains if you decide to use them as shower curtains. This striped curtain that I used is actually a standard sized 72" shower curtain. To make them longer I purchased 2 and attached an extra piece to the bottom of the curtain using heavy duty hemming tape!
This bathroom update has reminded me that sometimes small changes can make a huge impact. I've always known this, but for this space I didn't practice that. I kept the bathroom in a state that made me very unhappy because I felt that in order to make that space look good, that everything had to be ripped out and replaced. I waited and waited for that "one day" where we would have a big ol' bathroom remodel. Although this isn't your typical bathroom remodel, I'm extremely happy with the results!
Thanks to my wife who was there to support me and to paint all the trim and replace all the caulking! I love you! Thanks to my sis and mom who helped me choose my color scheme. Thanks to my brother in law who guided me when installing the lighting and dimmer. Thanks to Lamps Plus for sponsoring me and supplying the beautiful lighting for this project and a big thanks to my Instagram family and Blog family who left encouraging comments and shared my excitement in regards to this makeover :)
This was absolutely brilliant!! I love it and totally love your style! The fact that you were able to make that level of transformation on a budget is inspiring. Quick question - do you remember where you purchased the leopard mat?
Hi Sherry! Thank you so much! I can't believe the change! To answer your question, I purchased the animal print tug at Hobby Lobby for I believe about 10 bucks!
Omg!! Love it! And I even got teary eye at the end, like all our hard work paid off and we have a beautiful master bath❤😍 Thank you for working soo hard and making it amazing like always!
Oscar, You are so talented! This bathroom transformation looks fabulous. And besides that, you make me laugh about how you didn't want to mess up any of the plumbing or whatever and have to hear about it for the rest of your life! Hahaha....sounds like something my husband would say! Great job, as always!


Oscar! It looks fabulous!!! I see your signature style all over and that you were able to do it on a tight budget is very inspiring!
ReplyDeleteThank you!! Yes, I'm so happy that now the bathroom coordinates with the rest of the house. I didn't think it was possible with such a small budget :)
DeleteThis was absolutely brilliant!! I love it and totally love your style! The fact that you were able to make that level of transformation on a budget is inspiring. Quick question - do you remember where you purchased the leopard mat?
ReplyDeleteHi Sherry! Thank you so much! I can't believe the change! To answer your question, I purchased the animal print tug at Hobby Lobby for I believe about 10 bucks!
DeleteOmg!! Love it! And I even got teary eye at the end, like all our hard work paid off and we have a beautiful master bath❤😍 Thank you for working soo hard and making it amazing like always!
ReplyDeleteThank YOU! 😘
DeleteBRAVO, just like your name!
ReplyDeleteHaha thanks so much! 🕺
DeleteHi Oscar! Looks absolutely beautiful!
ReplyDeleteMsjazzie
Hi Jazzie! Thank you so much!
DeleteAwesome! The stick on subway tiles are cool
ReplyDeleteBrian, I was so blown away by the subway tiles! They look so good and were so easy to install!
DeleteOscar,
ReplyDeleteYou are so talented! This bathroom transformation looks fabulous. And besides that, you make me laugh about how you didn't want to mess up any of the plumbing or whatever and have to hear about it for the rest of your life! Hahaha....sounds like something my husband would say! Great job, as always!
Thank you so much! Yes, In most cases I think I'd rather pay someone to do a job for my own sanity lol
DeleteHello¡ Love it! Long time follower from Oxnard CA. Beautiful as always
ReplyDeleteHi thanks so much! I appreciate you following along 🥰
DeleteAbsolutely fantastic!!
ReplyDeleteThanks Ashyn! I'm so happy with the results!
DeleteOscar it looks amazing!!!!! Love what you did!
ReplyDeleteThanks Amber! So happy with it! 😊
DeleteIt looks awesome! You did a great job staining. I thinks it's funny that your wife trusts you with electric but not with vinyl tiles. LOL
ReplyDeleteLol we were just talking about that actually. She should definitely not trust me with either! 😆
Delete