
Curtains are SO IMPORTANT in a room and can literally make or break the overall style of a space. Cheap-y, flimsy, wrinkle-y and badly hung curtains are THE WORST and only not having curtains at all come at a close second! Unfortunately, beautiful curtains cost A TON of money. Let me just give you an example: I once got a quote for custom curtains for 3 windows (in a beautiful designer fabric) and the total was something like $16,000.00!! I literally laughed in the salesperson's face. I mean, that's ridiculous.
Fortunately for us peasants, IKEA exists.

Our master bedroom has been looking a little blah in the style department and everything in there looked a bit mundane and generic to me. I think the main culprit was the fuddy-duddy curtains and the ho-hum lamps (along with a few other things, I'll get to that in another post. ) To make the long story short, I decided to dress the windows more appropriately, knowing that doing so was going to make the biggest change in the bedroom. I mean, there's more windows than wall space in our bedroom, so dressing them well should have been my top priority to begin with!
If you follow my Instagram stories you know that I ended up ordering plain white curtains from IKEA. They're pretty thick and have a sort of linen-like texture to them but without the sheerness of linen. These simple curtains come in a two-pack and are only $29.99! So, $15 a panel which is a STEAL. Along with the curtains I also ordered curtain hooks, curtain rings and hemming tape. In this post, I want to 1: give you a list of everything I used to hang my IKEA curtains and 2: share what I did with these curtains so that they look great without having to spend $16,000.00! Good news: it's possible! Just check out the before and after and see what a freaking difference changing out the curtains (and lighting) made in the room! It's CRAY!
Here's the before:
 |
| BEFORE: Standard, store bought 84" curtains were hung so close to the window, making the ceiling seem low and the windows look narrow. Let's not even mention the weird, "one panel per window" asymmetrical thing... it's bad and I'm embarrassed. |
Here's the after:
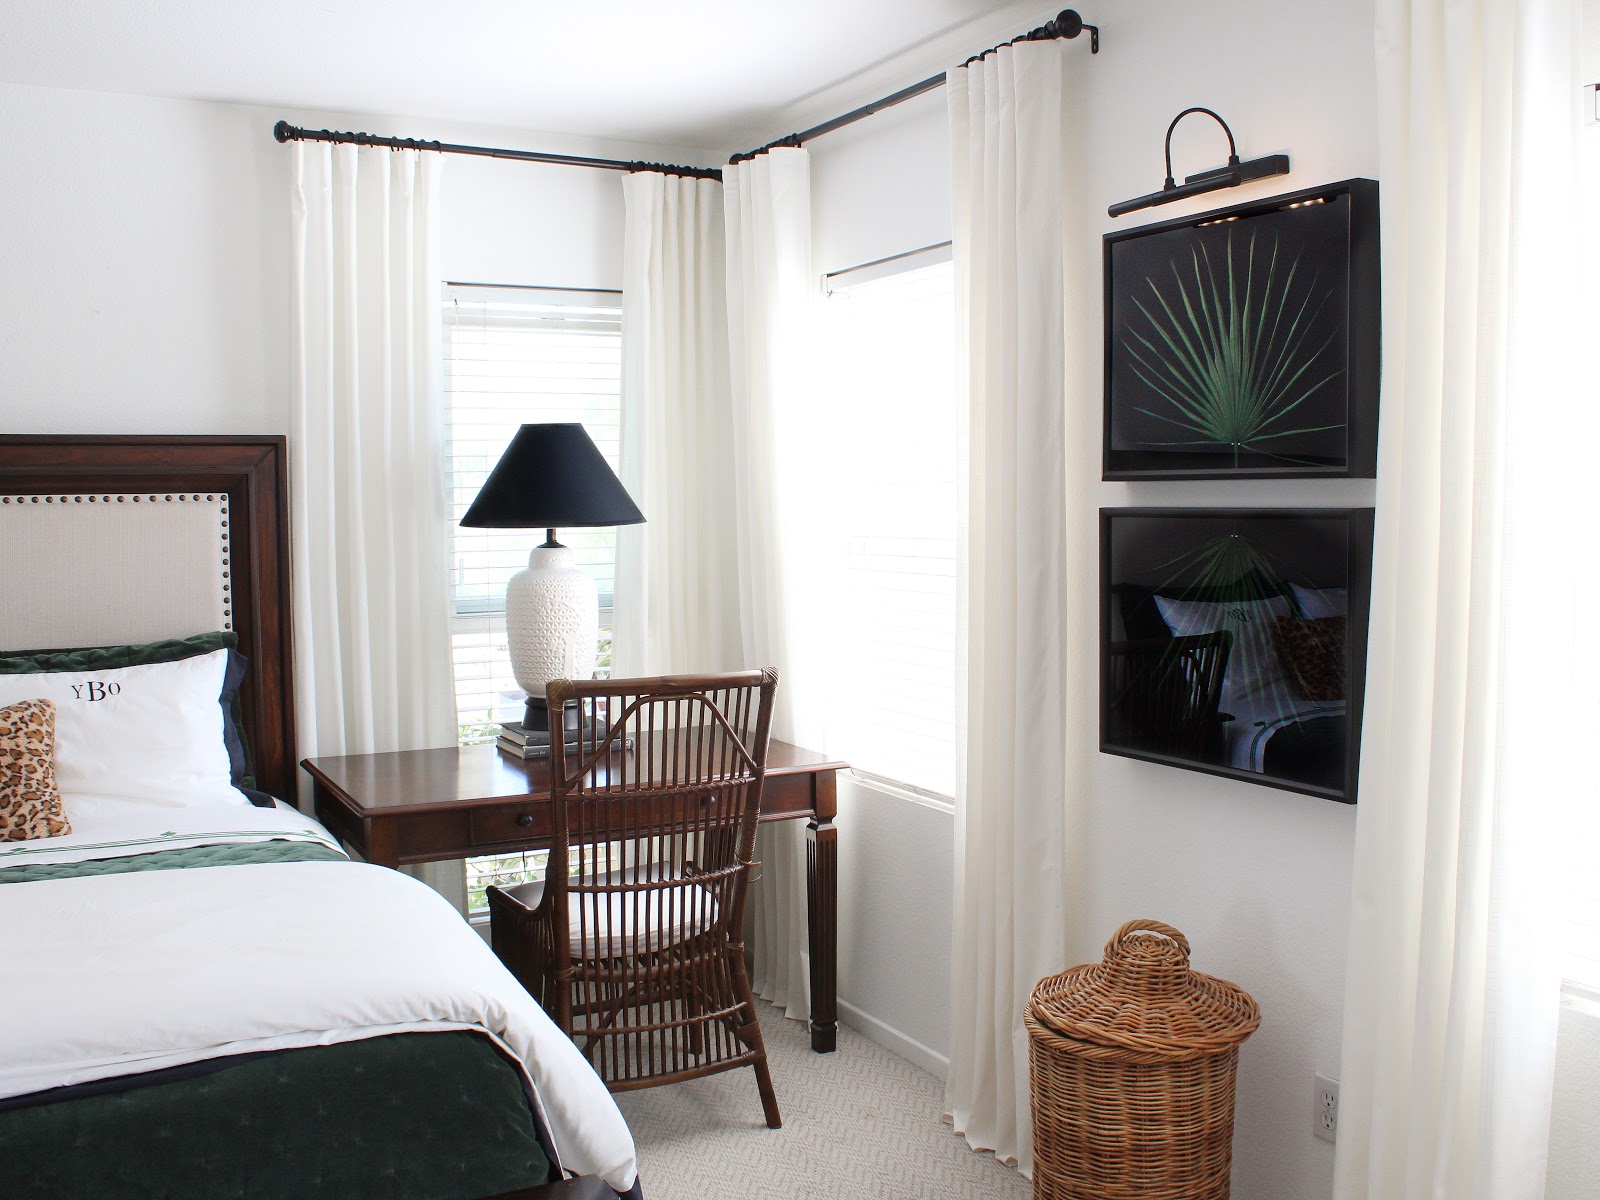 |
| The windows look bigger, the walls look taller, the space looks finished. Simply hanging the rods close to the ceiling and wider than the window changed everything. |
SEE?! The difference is DRAMATIC!
I have 4 windows in my master bedroom. The two windows on the wall where the bed is measure 70" tall and 29" wide ( or 6' 7" tall and 2' 5" wide). The two windows on the wall with the framed palm leaves measure 52" tall and 35" wide ( or 4' 4" tall and 2' 11" wide). The ceiling is 96" tall (or 8' tall).
Here's a list of everything I used to create this look
- 4 packs of IKEA RITVA curtains, size 58"x 96". (Each pack contains 2 panels, so I used 8 panels)
- 8 packs of IKEA SYRLIG curtain rings in black, size 1.5". (Each pack contains 10 which is enough for one curtain panel)
- 4 packs of IKEA RIKTIG curtain hooks. (Each pack contains 20 which is enough for two curtain panels)
- 2 packs of IKEA SY iron-on hemming tape. (Each role is 33' which is enough for about 6 curtains with a little left over)
- 4 matte black 1" thick curtain rods, size 36" to 72". Find them HERE

This is what I did to create this look on my windows
- I hung the curtains high! I hung the curtain rods 3" from the ceiling. Doing this lifts the ceiling, making the room feel more spacious and the windows look grander.
- I extended the curtain rod about 10" out from either side of the windows. This allows me to fully open the windows when the curtains are pushed back, letting beautiful light to pour in. It also makes the windows look wider.
- I used two panels for each window. This created a balanced look. Also, when I close the curtains, the fabric still pleats, which is what you want. If your windows are really wide, you might need extra panels. You want to avoid a flat, bed sheet-looking curtain when they're fully closed. Gotta have those pleats!
- I used 1" thick curtain rods. I prefer them over thinner rods which can look flimsy.
- I used curtain rings and curtain hooks. This creates beautiful pleats in the fabric because of the way they hang. The rings also make it easy to open and close the curtains since they slide so well on the curtain rod.
- I didn't use curtain clips. This is a personal preference, but I don't like exposed curtain clips. I think it looks less "$16,000.00 curtains" if you know what I mean...


- I steamed my curtains. Guys, you can't just hang the curtains out the package and hope that the wrinkles will just come out. They wont.
- I pleated the fabric with large pleats. One pleat in, one pleat out. The pleats stay up better that way instead of just gathering all the curtain fabric together like an accordion.
- I hemmed my curtains. The length of your curtains is a personal preference. Most people love when the bottom of the curtain just "kisses" the floor. Some people recommend 1/2" above the floor for ease of cleaning the floor and some people like the bottom of their curtains to puddle the floor. I like my curtains just a tad long so that the bottom of the fabric breaks just a little. Oh, just so you know, I can't sew and I don't have a sewing machine. I used IKEA's iron-on hemming tape and it worked great! Unfortunately if you wash your curtains, you might have to re-hem them by ironing the tape again, but fortunately for me I don't have to worry about that because I don't wash my curtains anyway, HA! Is that gross? Is that weird? Do you wash your curtains?? I mean, I dust them by vacuuming them regularly, but I don't remember ever throwing curtains in the wash...
See! No need to spend $16,000 to get decent-looking windows! All it takes are some small details and you'll have curtains that accentuate your room and make it look better than before :)
I'm including a collection of Instagram videos I put together so you can a better idea of the things I spoke about in this post.
I hope this post is helpful to you and please, if you have any questions just leave them below in the comments. I'll be more than happy to answer them.
Stay tuned! This bedroom isn't done yet! Now that I have the curtains hung I can move on to what's really going to make this room look great - the accessories!
'Till next time!
Oscar
Hi I know I'm super late to the party but I just wanted to thank you for the tip about folding the panels front and back! It was a game changer for my thicker Ikea curtains, which now hang much more straight and even. Less folds = more structure :)
ReplyDeleteHi there! You're welcome! I'm so happy to have been able to give you useful information ☺️. These little things definitely make a difference to plain curtains
Delete